
Introduction
This lesson shall introduce the use of strings and clusters in the LabVIEW development platform. The data type string is a sequence of ASCII characters typically used to store textual data. A cluster is a data structure used to group data together, similar to an array, but differing in that it can contain data of different types (Boolean, string, numeric, etc.).
This lesson shall also discuss modes of error handling in LabVIEW, particularly how errors can be stored in a cluster and be passed to the Front Panel to inform the user.
Strings
‘String’ is a data type common in text-based programming languages and is also included in the LabVIEW development environment. A string is a sequence of ASCII characters and incorporates both displayable and non-displayable characters. Strings have many purposes including: displaying information to users on the Front Panel; controlling instrumentation by encoding commands; or adding contextual information to data exported using File I/O commands.
Scrollbars can be added to string indicators to save space on the Front Panel.
String Functions (located in the ‘Functions Palette >> Strings’ sub-folder) allow for various modes of interrogating or manipulating the string variable.
We will not cover the various String Functions in this lesson but further information pertaining to String Functions and how they are used can be found in National Instruments online resources:

Clusters
Clusters are a data structure used by LabVIEW to group data of differing types together. In a text-based programming language such as C/C++, LabVIEW’s Cluster is analogous to the ‘Struct’ data type. Clusters have various purposes, and one common use is to store various pieces of information relating to an error so that that information can be relayed to the user in a useful format. An error cluster may include:
- A Boolean variable acting as an error flag.
- A numeric variable indicating an error reference code.
- A string variable providing a description of the error.
Note: Whilst Clusters can contain both Control and Indicator objects; an individual Cluster can only contain exclusively Controls or exclusively Indicators, i.e., LabVIEW does not permit a mixture of Control and Indicator objects in a single Cluster.
Manually Creating a Cluster
To manually create a Cluster in LabVIEW, first a Cluster shell must be placed on the Front Panel. This Cluster shell can then be populated with the Control or Indicator objects.
To place the array shell, select ‘Controls Palette >> Data Container >> Cluster’ and left click on the front panel to place the object.
The Cluster shell can then be populated with various objects, by dragging and dropping controls or indicators into the shell body.
Note: A Cluster is set as a Control Cluster or Indicator Cluster by the first object placed within it. If the programmer attempts to place indicators into a Control Cluster shell, LabVIEW will automatically convert the Indicator to its respective Control object.

Figure 1: Cluster Shell Object

Figure 2: Dragging an object into a cluster, e.g., a Boolean control

Figure 3: A Cluster populated with Control objects
Manipulating Clusters using LabVIEW Cluster Functions
LabVIEW provides several tools for manipulating Clusters, these are commonly termed ‘Cluster Functions’ and can be found in ‘Functions Palette >> Cluster, Class and Variant’ from the Block Diagram. The most common Cluster functions involve bundling, unbundling and updating objects within the Cluster:
- Bundle – Creates a Cluster grouping of all the objects wired into it.
- Bundle by Name – Replaces an object within a Cluster, referencing the object by its name.
- Place various Controls of different types onto the Front Panel.
- On the Block Diagram, place a Bundle Function and wire each of the Control Objects into the input terminals.
- Right-click the output terminal and select ‘Create Indicator’ to place an illustration of the created Cluster onto the Front Panel.

- On the Block Diagram, place an Unbundle Function and wire the previously created Cluster into the input terminal.
- Right-click each output terminal and select ‘Create Indicator’ to place each of the objects contained in the Cluster onto the Front Panel as de-clustered Control Objects.

- Place a ‘Bundle by Name’ function on the Block Diagram and wire in the previously created Cluster to the top terminal.
- Expand the ‘Bundle by Name’ function to show all input terminals by resizing the function on the Block Diagram.
- Each object in the Cluster can now be updated using the input terminals as illustrated here by updating the Numeric Control object from value 25 to value 15.

Error Handling
Grouping error data into Clusters is a powerful means of handling error reporting. In fact, many of LabVIEW’s pre-built VIs (Express VIs, DAQ VIs, File I/O functions, etc.) use this method for managing their error data. Clustering error data in this manner adheres to a standard approach for passing error data between VIs and subVIs and therefore will likely be more efficient than doing so in an ad-hoc approach.
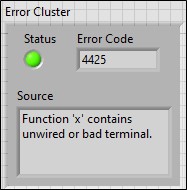
An Error Cluster generally contains the following information:
- Status – A Boolean variable acting as an error flag.
- Code – A numeric variable indicating an error reference code.
- Source – A string variable identifying the location at which the error has occurred.
Description – A string variable describing the nature of the error.
Summary
This lesson has provided a brief introduction to the string data type, clusters and error handling in LabVIEW. Additional resources pertaining to handling of error using Error Clusters can be found at: