Fitting saddles

How to fit a saddle

The principle of fitting saddles is the same whatever the type of saddle and should be done with your horse standing squarely on level ground with his head and neck straight ahead, do not use a numnah.
1. Position of the saddle
Place the saddle slightly forward on the horse's withers and pressing down on the pommel, slide the saddle rearward until it stops at the resting place which is dictated by each horse's conformation and will always be behind the horse’s shoulder blades. Too far forward will interfere with the horses movement.
2. Check the angle of the points
The points of the saddle are found in the point pockets, one on each side of the pommel of the saddle under the saddle flaps. The points should lie parallel to the withers. If the angles are too narrow, the points will dig into the muscles and also cause the middle of the saddle to be in uneven contact with the horse's back. If they are too wide the saddle will sit on the withers. To check the point angles, stand looking from the front with the flap lifted; the points should be parallel with the musculature within 10 degrees of the heaviest side.
3. Panel pressure and contact
Place one hand in the centre of the saddle and press down to secure the saddle in place as you test for panel pressure. Run your other hand between the front of the panels and your horse's musculature and feel for any uneven pressure under the points. While maintaining pressure on the top of the saddle, run your hand, palm up, under the entire panel along the back feeling for even pressure.
4. Pommel to cantle relationship
Visualize a straight line parallel to the ground from the pommel to the cantle. In saddles with deep or moderately deep seats, the cantle should be between 2 to 3 inches higher than the pommel. In shallower seats, such as close contact jumping saddles, the cantle may only be approximately 1 to 2 inches higher than the pommel. In almost any saddle, if the cantle is level with or below the pommel, the saddle is not properly fitted.
5. Level seat
Visualize the same straight line parallel to the ground and look this time at the deepest part of the seat. This area should be level in order to put the rider squarely on their seat bones and in balance.
6. Wither clearance

This should be done with the horse mounted and unmounted

There should be adequate clearance between the pommel and the top of the horse's withers, approximately two to three fingers. More than three fingers’ clearance may mean the pommel is too high, i.e. the tree is too narrow. A saddle with less than 2-3 fingers may mean that the saddle is too wide. Horses with flat, round withers may have more clearance than usual under the pommel. In these situations you may need to rely more on the balance of the seat and pommel to cantle relationship. On horses with high, narrow withers maintaining proper clearance is something that has to be monitored and maintained.
7. Channel clearance/Gullet width

This should be done with the horse mounted and unmounted

There should also be adequate clearance over the spine and connective tissue throughout the channel of the saddle. A channel that is too narrow will impede the horse’s movement dramatically and may even cause the spine to be observably sore. Feel the width of the spine and connective tissue with your fingers and estimate its width. The channel of the saddle should completely clear this width, resting on the long back muscle of the back called the longissimus dorsi.
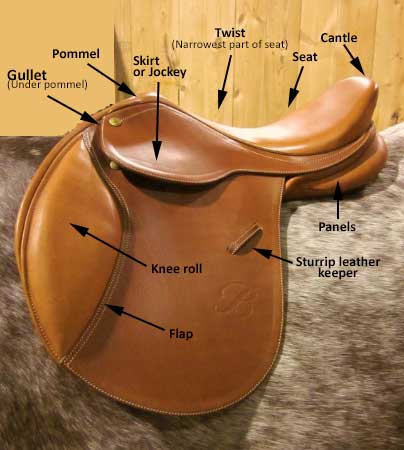
Saddle diagram

Fitting exercise boots

This video shows how to fit exercise boots.

Activity

Fitting tack is a practical skill and this now should be practiced.

UHI logo

All efforts have been made to ensure materials created by the EDU comply with current accessibility guidelines (JISC: Support for learners with disabilities).

If further assistance is required with accessibility matters please contact the student support section in your academic partner UHI: Accessing learner support.

We welcome any comments on how to improve this unit. Please feel free to pass these on at any time.

If you have any difficulty viewing this resource please contact EDU (edu@uhi.ac.uk) with:

  • the name of the resource;
  • a description of the problem (please give as much detail as possible);
  • the section of the resource where the problem occurred;
  • your internet browser (you can check your browser version at: http://detectmybrowser.com/).

UHI provides links to external sources of information and may refer to specific Web sites, products, processes or services within this resource. Such references are examples and are not endorsements and whilst every effort is taken to ensure the accuracy of information provided UHI is not responsible for any of the content or guidance. You are advised to exercise caution.

Audio

Video

Reading

Download

Information

External link

Activity

Print

Question

Asterisk

Discussion

Collaboration

Reflection/journal/log

History

Download a copy of this resource in PDF format.

You can also print individual pages by printing directly from the browser.

×